Device Client Overview
The Remote Sampler device client handles all the on-site functionality required by a sampler or courier for completing a full day of sample collection. This functionality includes:
- Scheduled sampling
- Ad hoc sampling
- Daily and weekly checks
- Courier pickups
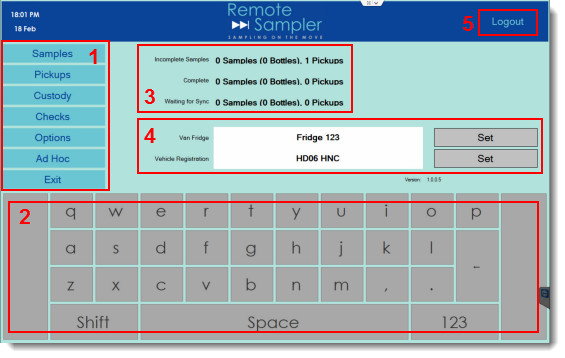
The Home screen of the application is shown below. This is the first screen displayed following log in and it allows access to each of the different areas of functionality within Remote Sampler.

The numbers highlighted on the image above are explained below.
- The main menu - provides a button for each of the main actions in a sampling day.
- A touch-screen keyboard that will become active whenever a field is pressed that accepts data input.
- A summary of the work that is currently on the device.
- Fields for the vehicle registration and van fridge.
- A button to log out the current user.
Remote Sampler provides a simple workflow wizard to help guide the user through the sampling tasks for the day. Screens that are part of the workflow wizard appear as shown below.
The numbers highlighted on the image above are explained below.
- Back button - This moves back to the previous step in the workflow.
- Home button - This moves back to the home screen.
- Status panel - Shows important indicators about battery life and connectivity.
- Keyboard - Will activate whenever data for a given field can be entered.
- Workflow area - Shows information about the data or actions that are needed at this stage in the workflow.
- Next button - Moves to the next step in the workflow.
To complete a sample or any similar multi-step process within Remote Sampler, simply work through the data required on each screen and tap the Next button to continue.